Setup Guide

PaidBot Tutorial — Step by Step

Account setup, AdsPower configuration, bot settings, proxy integration, automation setup, and batch execution — complete step-by-step guide with screenshots.

1

Requirements

Prepare the following requirements before running the bot:

1 Windows PC

The PaidBot desktop application currently supports Windows operating systems only. A stable internet connection is recommended.

2 Install AdsPower

Install the AdsPower anti-detect browser and log in at least once. The bot uses the AdsPower Local API to create profiles.

3 PaidBot Account

Register on the website using a free or paid plan. Your active subscription and remaining profile quota will be displayed in the dashboard.
2

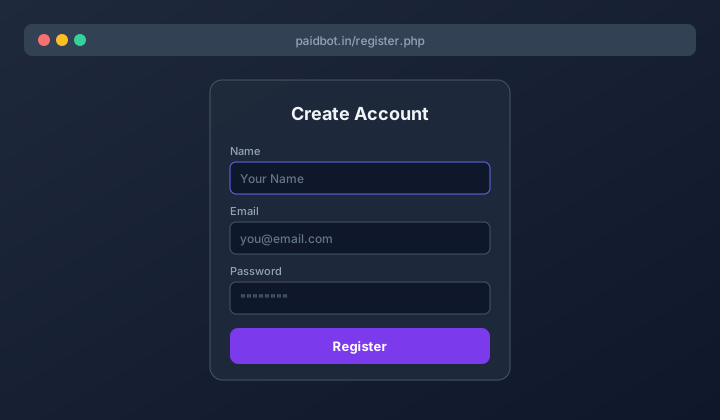
Step 1 — Create an Account

Create a new PaidBot account:

Open the Registration Page
Screenshot: Open the Registration Page

1 Open the Registration Page

From the home page, click Get Started or Register. Enter your name, email address, and password (minimum 8 characters).
  • Use the same email address that will be used for bot login.
  • Paid plans can be activated after registration through checkout.

2 Login

Go to the Login page and sign in using your email and password. You will be redirected to the User Dashboard.
3

Step 2 — Download the Bot

Install the desktop automation application:

Downloads Page
Screenshot: Downloads Page

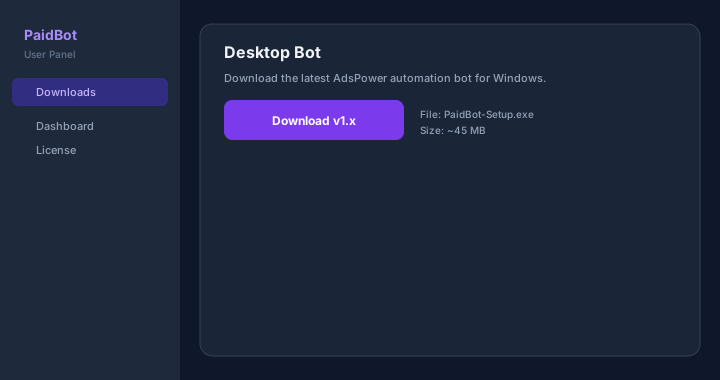
1 Downloads Page

Open the Downloads section from the dashboard sidebar or use the Download Bot button from the homepage. Download the latest .exe installer and complete the installation.
  • If Windows SmartScreen displays a warning, click "More Info" → "Run Anyway" if the file was downloaded from the official website.
4

Step 3 — AdsPower Local API Setup

An API key is required to connect the bot with AdsPower:

Enable Local API
Screenshot: Enable Local API

1 Enable Local API

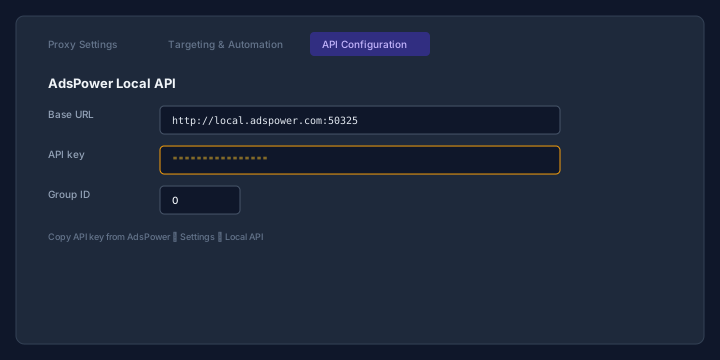
Open AdsPower → SettingsLocal API. Ensure the API status is set to Running. Note the API Address (usually http://local.adspower.com:50325).

2 Copy API Key

Copy the API Key from the same page. This key will be pasted into the API Configuration tab inside PaidBot. The default Group ID is usually 0.
  • If AdsPower is closed, the bot will not be able to create profiles.
5

Step 4 — Login to the Bot

Open the PaidBot desktop application:

Email & Password
Screenshot: Email & Password

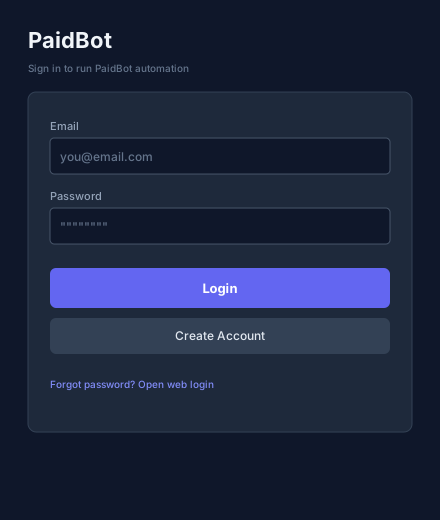
1 Email & Password

Enter the same email and password used on the website and click Login. During the first login, the device will automatically bind to your account depending on your plan limits.
  • Don’t have an account? <strong>Create Account</strong> opens the registration page in your browser.
  • If the device limit has been reached, remove old devices or upgrade your plan.
Check Account Status
Screenshot: Check Account Status

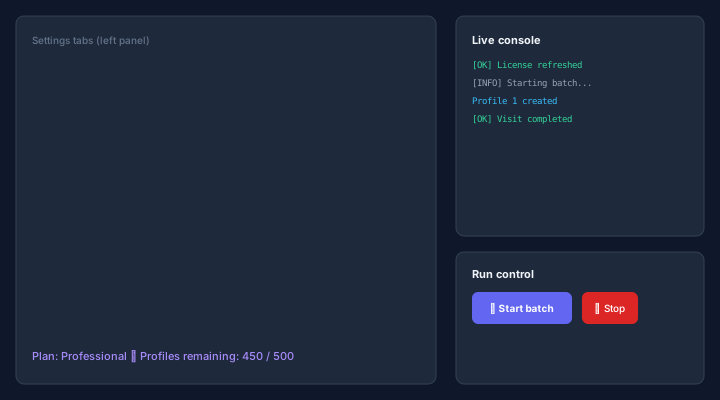
2 Check Account Status

After login, the top bar will display your plan name and Remaining Profiles. Use Refresh to update limits. Upgrade Plan opens the payments page.
6

Step 5 — Proxy Settings

Each AdsPower profile requires an assigned proxy:

Proxy List Format
Screenshot: Proxy List Format

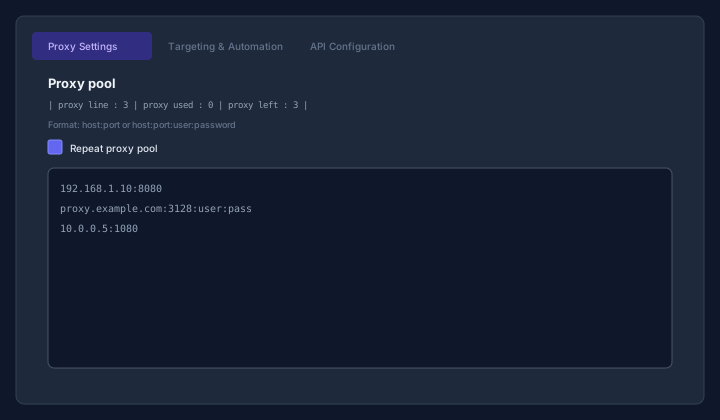
1 Proxy List Format

Proxy Settings supports one proxy per line:
host:port or host:port:user:password

2 Repeat Proxy Pool

Checkbox ON: proxies rotate continuously from first to last until the batch is stopped.
Checkbox OFF: each proxy is used once only and the batch stops after all proxies are exhausted.
  • Keep thread count lower than available proxy count to avoid errors.
7

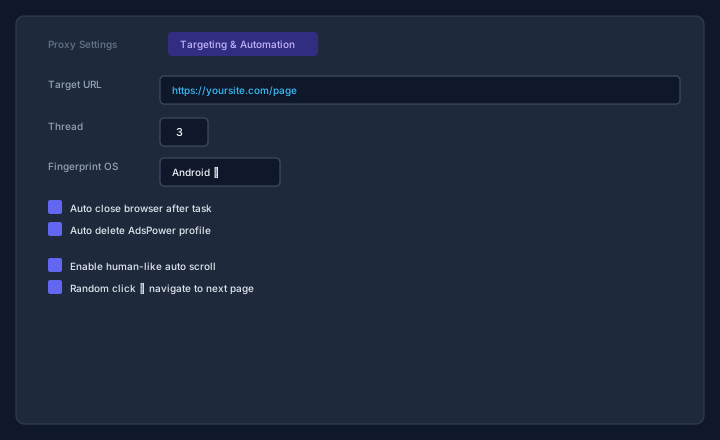
Step 6 — Targeting & Automation

Configure browsing behavior and profile settings here:

Target URL
Screenshot: Target URL

1 Target URL

Enter the full website URL where traffic is required (https://...). This becomes the starting page for every newly created profile.

2 Timing & Threads

  • Min stay on page — minimum time spent on a page
  • Page views min/max — number of random pages visited
  • Page max stay min/max — maximum random stay duration
  • Thread — number of profiles running simultaneously

3 Fingerprint & Lifecycle

Choose Fingerprint OS (Windows, Android, iOS, etc.) and OS Version. It is recommended to keep Auto Close Browser and Auto Delete Profile enabled.

4 Human Behavior

Human-like Auto Scroll and Random Click → Navigate simulate realistic user behavior. Optional: add redirect URLs for Auto Redirect.
8

Step 7 — API Configuration

Configure AdsPower connection details:

Base URL, API Key, Group ID
Screenshot: Base URL, API Key, Group ID

1 Base URL, API Key, Group ID

Paste the copied Base URL and API Key from AdsPower. Group ID defines where profiles will be created (default 0). Keep the default API Interval unless rate-limit issues occur.
  • Settings are automatically saved after changes.
9

Step 8 — Start the Batch

Run the automation after completing all configurations:

Start Batch
Screenshot: Start Batch

1 Start Batch

The Live Console displays real-time logs. Click ▶ Start Batch. Statistics cards will update Created, Completed, and Failed counts. Use ■ Stop to stop the process.

2 Profile Limit

If your subscription profile limit is exhausted, the bot will stop creating new profiles. Upgrade your plan or request additional quota.

Common problems & solutions

If something is not working correctly, please review the following troubleshooting steps first.

Ensure the email address and password match your website account credentials. Verify your internet connection and make sure the latest bot version is installed. Reinstall the bot from the Downloads section if necessary.

Make sure AdsPower is running correctly, the API key is valid, and the Base URL matches your AdsPower Local API settings. Ensure the firewall is not blocking the Local API connection.

Your remaining profile quota has been exhausted. Upgrade your subscription plan or delete unused profiles to continue creating new profiles.

All available device slots for your plan are currently in use. Remove old devices from the admin panel or upgrade your subscription plan for additional device capacity.

Verify the proxy format is correct, ensure the proxy server is active, and keep the thread count lower than the total number of available proxies.

Complete the setup process

Register → Download → AdsPower API → Bot configure → Start batch